Written By: Val
Val has put together in-depth instructions for not only removing and shimming the carb
needles, but also for performing a valve adjustment. Because these two processes require
the removal of so many of the same components, it is outlined accordingly.
 Well first thing you need are some tools:
- 10mm/8mm sockets - Extensions and drives
- Torque wrench
- Pliers
- Phillips screw driver
- 8mm open-end wrench
- Feeler gauge if your going to do valves
- Allen wrenches (If you bend your 3mm this will make carb removal much easier)
- Tape, marker, and magnet are nice to have but not necessary
- 1/16" drill bit and drill might be required in adjusting your pilot screws
Before doing the tear down I like to take the bike out and about a mile from the house I turn the petcock
to off and then approximately 1/8 mile from the house I do a shut down. I do this in top gear at about
4500RPM. Just hit the kill switch and pull in the clutch. I also recommend having less then a gallon of
fuel in tank.
Remove Fuel Tank:
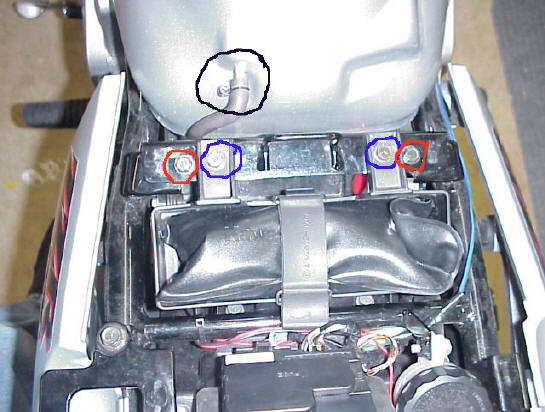 |
Blue: toolkit
Red: tank
Black: fuel overflow
|
 |
Blue: Fuel gauge sensor connector - push in detent and pull.
Red: Fuel line between tank and filter
|
- Get rid of the plastic and seat (Lowers and the do hickeys that go beside the tank)
- Now undo 2 bolts and pull the toolkit out
- Disconnect the negative battery terminal
- To begin removing the tank, make sure the petcock is in the off position and take your Phillips
screw driver and remove the screw. Leave the screw in the shaft and cover the hole with masking tape so
you don’t lose the screw
- Remove the overfill drain and keep the keeper on the hose
- Remove the two bolts at the top of the tank near the handlebars, then the two near the toolbox
- Lift the front of the tank and place a towel under the top bracket (to ensure you don’t scratch the
paint while trying to get the fuel line off
- Lift the rear of the tank 6 inches or so and you will see the fuel gauge connection and fuel line.
Disconnect the fuel gauge and then the fuel line. (Shouldn’t have any fuel drain if you did a shut down like
I mentioned and now you understand why I recommend a gallon or less in the tank. Makes it much easier to
move)
Remove Air Box:
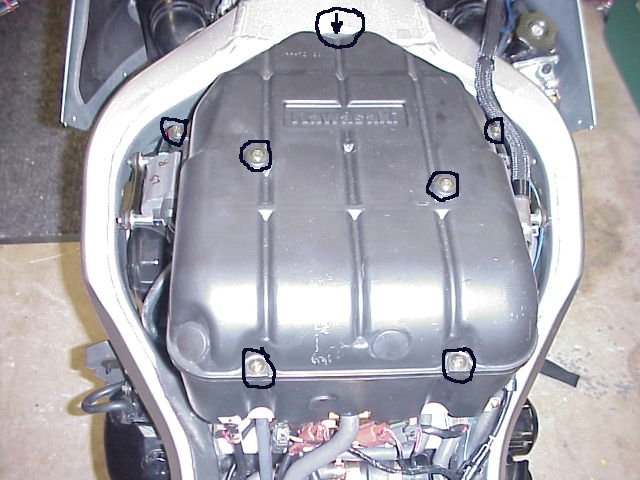 |
Black: Screws
|
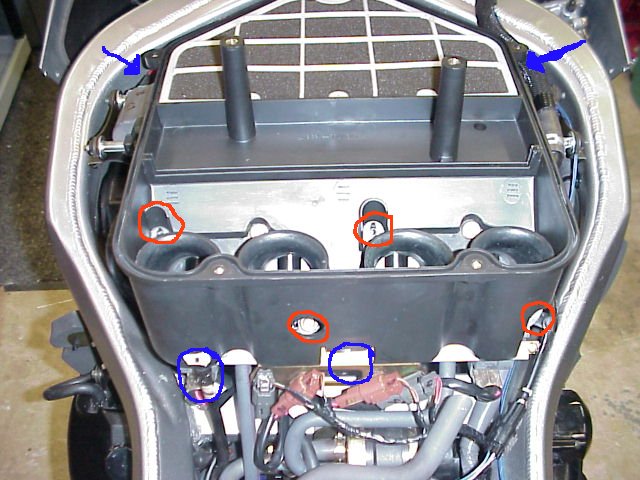 |
Blue: Vacuum Lines
Red: Bolts
|
- Now you see the airbox. Different strokes different folks. I take all 7 screws out and remove the upper
half.
- Use tape to cover the carb intakes (Prevents dirt and bolts from ending up some place they don’t
belong)
- Now remove the 4 bolts (red) and disconnect the vacuum lines (blue). Lifting up on the rear and pulling the
airbox base out may help in getting the vacuum lines. There is one line that connects to the bottom of the airbox
but isn’t held on by a clamp and will come off with a little tug. Use two pieces of tape to mark vacuum lines and
location. You probably won't confuse the location of the lines but when assembly begins the tape stands out and you
won’t forget to hook one up.
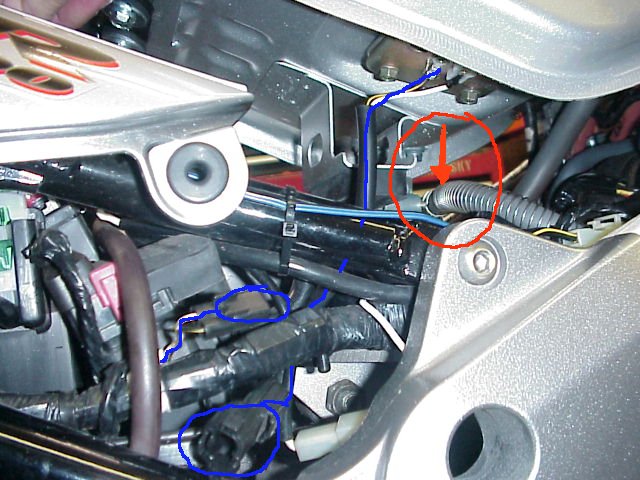
Disconnect Cables/Wires:
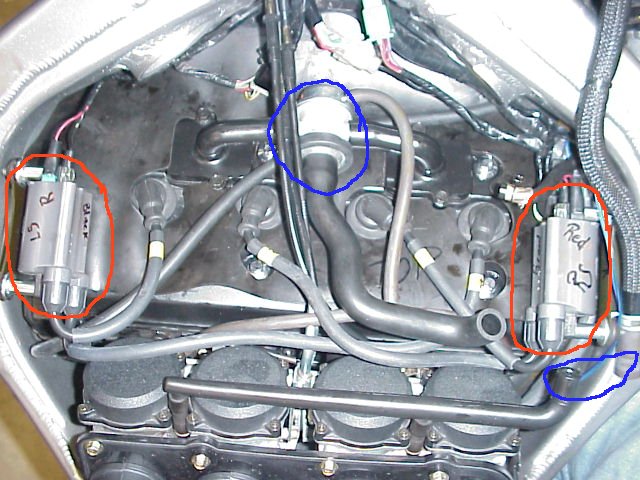 |
Blue: EPA Junk
Red: Coils
|
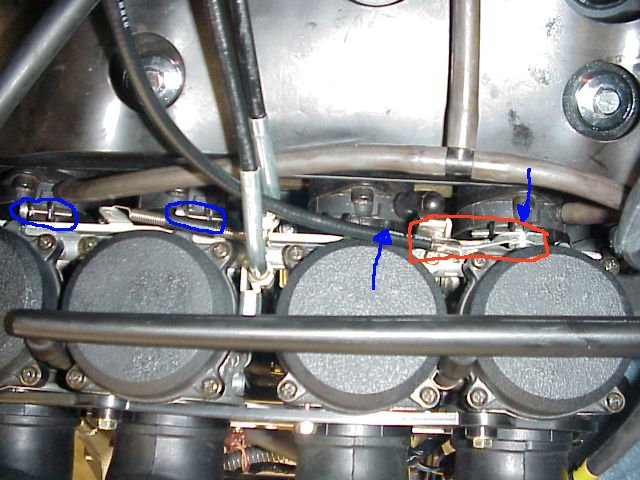 |
Red: Choke Cable
Blue: 3mm Allen Screws
|
 |
 |
- Disconnect the EPA junk (Blue)
- Disconnect the plug wires. They are numbered 1-4 so you won’t need to mark them, but you should
mark the coils (red) with location of wires and left and right side.
- Disconnect the 4 wires (2 each) providing power to the coils and then remove the coils w/brackets (4
8mm bolts). You can separate the coils from the brackets or leave them on. I’ve done it both ways and
have found it faster to just leave the bracket attached. You will need to use the 8mm open-end wrench
to get the left coil rear bolt off. All others can be reached with a deep 8mm socket.
- Remove the choke cable at the carbs (red). Grasp the choke cable and pull to the left. This will give
you the slack to remove it from the housing and then from the bracket. Then pull the cable out to the front
of the frame. I also highlighted the screw (3mm allen head) that secures the carbs. These screws do not need
to be loosened just yet. (just showing location).
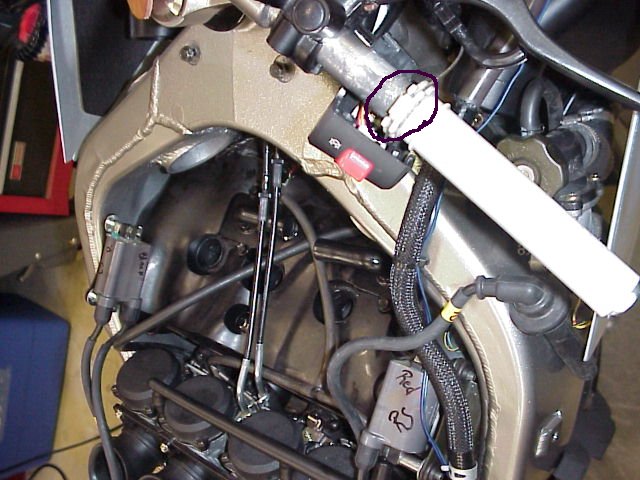
- You must do the opposite with the throttle cables. They are removed from the handle bar (2 phillips screws)
and pulled towards the carbs.
The last photo shows the throttle cables that have been pulled from the handlebars and now are positioned
hanging off the right side of the carbs. The 2 black circles show the heat shield connection point and no tools
are required for removal. Just pull the plastic cover up and just push the bottom of the heat shield towards the
front of the bike. It will fall between the radiator and engine.
If your just doing a valve adjustment you can just loosen the 4 allen-head screws shown above in Blue and this
will allow greater clearance when pulling the valve cover.
Carburetor Removal:
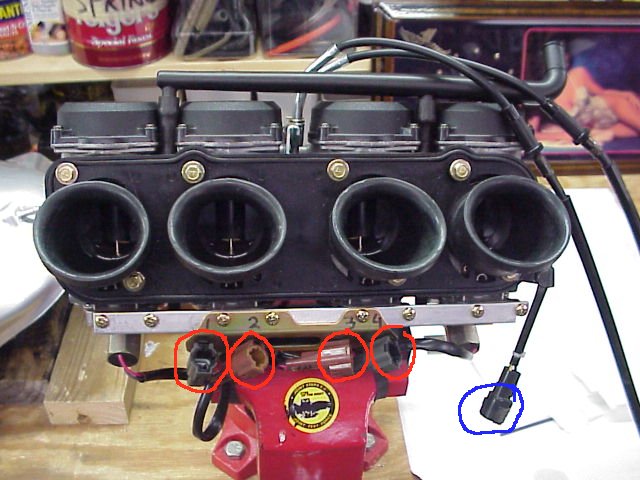 If your doing a carb shim and pilot screw adjustment you will need to pull the carbs by doing the following:
Disconnect the four fuel relays (Red)
Disconnecting the throttle sensor connector (Blue)
Loosen the four 3mm allen head screws (3 photos up in blue) until you see about three threads still showing.
Don’t remove the screw completely.
Remove the idle adjustment knob from the bracket not shown in the pic but it is located on the left side
of the bike (near the fuel on/off/res valve). If you do the above three steps and don’t remove the idle adjustment
knob you will find out what I’m talking about.
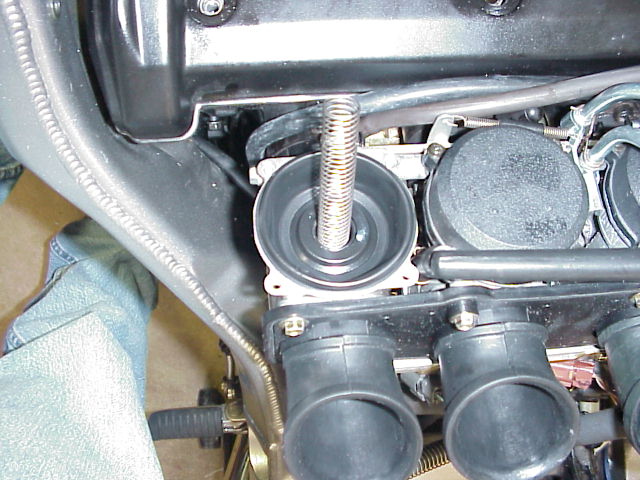
Carburetor Shimming:
I’ve got a picture and it shows the carbs still on the bike because I wasn’t going to get into adjusting the pilot
screw but it started raining so I had nothing but time. I don’t have my service manual here and if your going off
this you probably don’t have one either so the wording is not going to be OEM. It’s Val’s terminology.
 |
 |
|
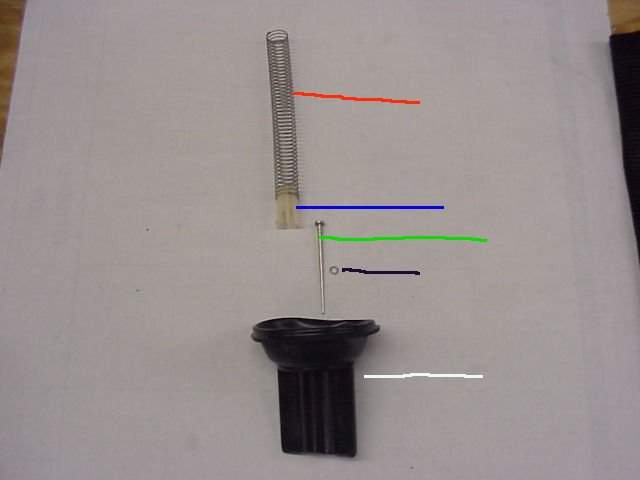
White: Slide
Black: Shim
Green: Needle
Blue: Spring Guide
Red: Spring
|
- Remove the four screws to get the top of the carb off. It may come up on its own when you remove the
screws because it has a spring under it
- Remove the spring
- Grab the black boot and lift the entire slide assembly up
The top-right photo shows one shim in place on the needle and the other next to the black mark. I used 2 shims per
needle and like the results.
Assembly is just opposite of disassembly.
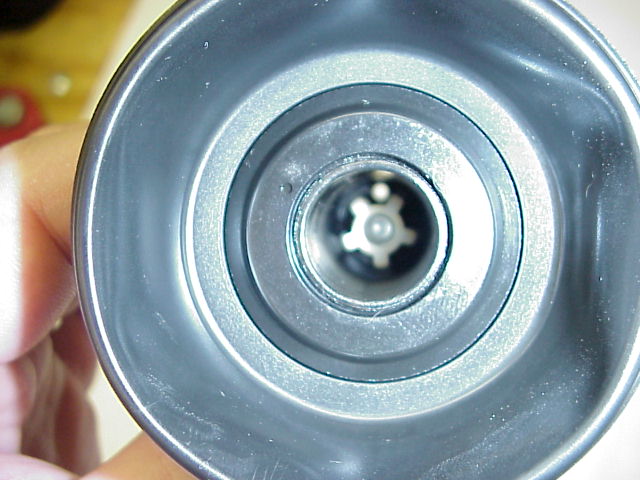 The two things to be careful of is insuring the spring guide does not cover the hole at the bottom of the
slide when assembling (refer to photo at right). The second being correct alignment of the seal at the top of the
boot on the carbs. The boot has a nipple at the 1 o’clock position and it will mate with the top of the carb.
Follow the same steps for 2, 3 and 4 and your done with shimming.
The two things to be careful of is insuring the spring guide does not cover the hole at the bottom of the
slide when assembling (refer to photo at right). The second being correct alignment of the seal at the top of the
boot on the carbs. The boot has a nipple at the 1 o’clock position and it will mate with the top of the carb.
Follow the same steps for 2, 3 and 4 and your done with shimming.
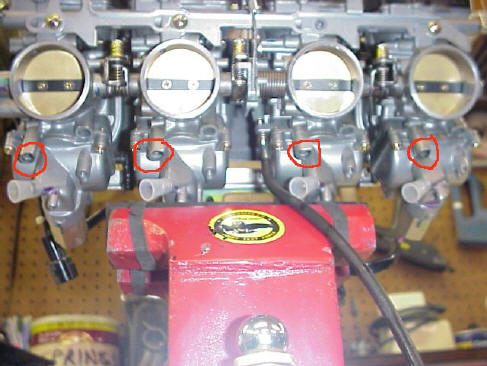 This photo shows the location of the pilot screws (red). One per carb and mine had caps covering the screws.
My manual said CA bikes have the covers and mine wasn’t a CA bike I don’t know if they all them or not. If you
have them you just have a couple extra minutes of work. Secure the carbs and take a small drill bit (smaller
then the diameter of the pilot screw cover). Carefully drill a hole in the center of the cap ensuring that after
you punch through the cap you stop drilling. When my bit punched through the cap the cap began to spin and then
I just pulled it (cap) off. After you have finished all 4 caps you need to grab a standard screwdriver and turn
the pilot screw clockwise. Just because you turn 1 screw 2 turns in doesn’t mean they are all set like that. If
the second pilot screw stops after ˝ turns don’t force it another 1 ˝ turns. You just want them all turned in so
you can now turn them out. I turned mine out (counter clockwise) 2 ˝ turns. Not saying that will be perfect for
you but it worked for me and has been the setting several others have used.
This photo shows the location of the pilot screws (red). One per carb and mine had caps covering the screws.
My manual said CA bikes have the covers and mine wasn’t a CA bike I don’t know if they all them or not. If you
have them you just have a couple extra minutes of work. Secure the carbs and take a small drill bit (smaller
then the diameter of the pilot screw cover). Carefully drill a hole in the center of the cap ensuring that after
you punch through the cap you stop drilling. When my bit punched through the cap the cap began to spin and then
I just pulled it (cap) off. After you have finished all 4 caps you need to grab a standard screwdriver and turn
the pilot screw clockwise. Just because you turn 1 screw 2 turns in doesn’t mean they are all set like that. If
the second pilot screw stops after ˝ turns don’t force it another 1 ˝ turns. You just want them all turned in so
you can now turn them out. I turned mine out (counter clockwise) 2 ˝ turns. Not saying that will be perfect for
you but it worked for me and has been the setting several others have used.
Congratulations!!! You now shimmed and adjusted your carbs. Drink a beer and pat yourself on the back but don’t
wait too long because you’ve still got to put it back together.
If you want to pull the valve cover off and check your valves just leave the carbs off.
Continue to: Valve Adjustment Procedure